Monday, 22 July 2013

Software Hardware Troubleshooting


Having a difficulty with your computer? We can perform analysis on your computer to determine the problem on your computer, and ensure it is up and running in no time. We conclude if the problem is a hardware issue or a software issue, so there is no need to worry regarding the type of problem you is having. You can leave that to our technicians. We suggest regular maintenance plans for business and Home users.

Hardware troubleshooting:

Hardware devices like hard disk drive(HDD), Central Processing Unit(CPU), RAM, routers, switches, modems and shared hardware devices as well as printers etc can be corrupted and damage network connections. We recommend secure services for computer hardware for troubleshooting.


Software troubleshooting:

Software problem can cause computer network to freeze up or crash down by malicious programs. Corrupt files, emails and other infected resource files can corrupt our software’s.


Alwahda services can do troubleshooting services for you. Just call us and we will be there to help you.

LG Hardware And Software Repairing


I see almost everyone in L9 forum is giving reference link to this flashing guide in their threads, but almost no one is mentioning any credit to this. They are just putting links. What do you all think, pals? Do I deserve a credit or not
Thanks to all developers and contributors: Bin4ry , adixtra ,unknown_world. I thank to all the users of this thread who gave feedback and reported issues time to time, which helped "us" to make this guide better and perfect.

First thing first, this is not my original work, I have just tried to consolidate all the scattered things together for SAFE and EASY flashing and rooting of L9 variants. Written this guide as many pals were having issues with OFFLINE KDZ FLASHING and help was scattered in many pages creating more confusion. 
Wow! After so much of followup with xda mods, finally we got Home (Sub-Forum) for LG L9 series. 

  1. PLEASE, USE INFO AT YOUR OWN RISK & INTELLIGENCE.
  2. Flashing KDZ removes Root and CWM, so you will need to root again.
  3. Flashing KDZ does not wipe your data, but if you get bootloops you need to hard-reset it, so please backup data first.
LG Update Tool works on all versions of windows (xp/w7/w8-32/64bit) for flashing any version of Android (GB/ICS/JB). If it does not work on your windows, something is missing on your system and if anyone here cannot help you then, you have find your own ways. Don't expect Spoon-feeding for everything.

DEVICES FLASHED WITH THIS GUIDE AND TESTED OK: LG Optimus 2x (P990) and LG Optimus L9 (P76?)

This thread contains two "MAIN" separate parts. 
[GUIDE] FLASH L9 Factory ICS/JB ROM WITH OFFLINE FIX + UNBRICKWorks perfect on Win-XP/W7/W8 32bit/64bit. UNBRICKS ALL SOFT-BRICKED L9 (P760/765/P768/P769) 

TRUST ME THIS IS NOT LENGTHY PROCESS, I JUST HAVE PUT THEM IN EASY STEPS FOR COMPLETE NOOB PERSON. EXPERTS PLEASE STAY AWAY FROM COMMENTING HARSH ON ME. 

THIS METHOD IS ALWAYS FASTER THAN ONLINE WITH PC SUITE, WHICH DOWNLOADS HUGE FILE ONLINE AND YOU NEED TO WAIT UNTIL IT FINISHES DOWNLOADING IN THE MIDDLE OF FLASHING. 

In first part of this Guide, we are creating a Local Web-Server for LG Support Tool and will try everything which will PREVENT the tool to connect to real LG server over internet. We have to create SMALL SERVER on our own system and redirect tool to this webpage.

FIRST DOWNLOAD YOUR OWN OFFICIAL KDZ (LG ROM) FILE FROM MY ROM COLLECTION PAGE or from anywhere and proceed... 

0) Precautions: 
___A) Select "Debugging Mode" as ON (Ticked) in Phone Settings (Developer Section)
___B) Select "Install from Unknown Sources" as ON (Ticked) in Phone Settings (Security Section)
___C) Indian version of L9 does not come with "Lookout Security Antivirus" already installed. But KDZ from other countries may have it already installed, FORCE CLOSE AND UNINSTALL it from app manager. If you cannot uninstall, at leastDISABLE it. This program is known to be preventing connection and rooting of device.
___D) Remove all other USB devices (external hdd, backup drives, other phones, etc) and cables connected to PC to avoid issued due to voltage loss. (example)
___E) OFFLINE KDZ FLASHING DOES NOT LOOSE PHONE DATA, BUT YOU MUST BACKUP YOUR PHONE IN ANY CASE.

1) Find NOTEPAD program from StartMenu of Windows and Right Click on it and run it with "Run as Administrator" option. Remember use "Run as Administrator" while opening, otherwise you will not be able to save it after changes. 

Now you need to open "HOSTS" file located in folder "C:\Windows\System32\drivers\etc\" with following method. 

Click File Menu >>> Open File >>> Now copy-paste following in "Open File" Box. 


Quote:
C:\Windows\System32\drivers\etc\hosts
Please note the opened file name is only "hosts" and does not have file-extension like txt or anything.

When file is opened, add following lines at bottom of "hosts" file, a file with no extension like txt/doc/xls.

Quote:
127.0.0.1 csmg.lgmobile.com
127.0.0.1 csmgdl.lgmobile.com
Now SAVE file and Close it. 


Content of Hosts file looks like this sample file. Close this file , because we may not need it after this point. 
AND RESTART PC NOW (check if lines are still there after Restart. They should be there.)


2) INSTALLING SMALL SERVER: Download "shttps.zip" (attached below) and Extract the Zipped folder "shttps" in root ofC-drive of your computer. 
Now Right click on "C:\shttps\http.exe" file and "Run As Administrator" and in Windows Compatibility Mode with "WindowsXP SP3" (must for Win7/8) , a server status window will open "MINIMIZE IT BUT DONT CLOSE IT" and you will also see a SMALL SERVER icon in TASKBAR, like mentioned below.


WEBSERVER TESTING: If webserver is running correct, YOU SHOULD SEE A SWEET GIRL WITH L9 WHEN YOU CLICK THIS >>> http://127.0.0.1:9002
If you don't see a GIRL, something is wrong. Start again.


COMING TO ACTUAL FLASH PROCESS.

3) Download (attached) and Extract "KDZ_FW_UPD_EN.zip" and save the folder on desktop or any suitable place on your hard-disk.

4) Optional if "MSXML 4.0 SP3 Parser" is already installed before: Install it by finding and installing "msxml.msi" file in flash folder.

5A) Optional if "B2CAppClient" is already installed before: Internet Must be ON and Right-Click onB2CAppSetup.exe and Run As Administrator. If not installed before, it will download a setup file, will install it and open "LGMOBILE SUPPORT TOOL" box as shown below. Without doing anything just close this box because we will install latest LG Universal Android driver manually in next step.


5B) Optional if "LG USB Driver" is already installed before: Install latest "LG USB Driver (Download 3.8.1 here)" (Ver 3.7.2) Remember your Phone is not connected yet. 

NOW YOU ARE ALL SET AND READY TO FLASH

6) Never installed JellyBean before and with Locked Bootloader? Then Connect Phone in Software Upgrade Mode: Switch OFF the phone and Press VolumeUP button and insert USB cable into phone, Now phone should show SW Upgrade Mode. 

Let windows load any drivers, wait until it finishes. TWO ENTRIES SHOULD APPEAR IN DEVICE MANAGER IF DRIVERS ARE PROPERLY INSTALLED, LIKE THIS SCREENSHOT or this screenshot. (ignore detected entries in following screenshot, they will be different every time)

Quote:
Post-JB issue: If you have installed JellyBean before, Phone may not go in "Software Upgrade Mode" or Flashing stops at 14% in 11th step. 
Then do this 
WORKAROUND: Keep the Phone POWERED ON with USB connected and on "LG Software" mode and do next step of flashing KDZ with Update tool and the phone will automatically go in software upgrade mode.
7) Execute "UpTestEX_mod2_marwin.exe" with "Run As Administrator" option and in Windows Compatibility Mode with "WindowsXP SP3" (must for Win7/8) >> and Select your KDZ file. Select "3GQCT" in Type of Flash and select "EMERGENCY" for PhoneMode. Ignore all other options and press "NORMAL WEB UPGRADE TEST" at bottom. This button is very light and hard to see at first attempt. 


IMPORTANT: Do not change names of the KDZ files from LG server or downloaded from my this and this page.(They should look like.... "V10G_00.kdz" or other version in same style.)

8) Now "Read Phone Information" box will open with blank information, Just press "Upgrade Start"


9) A small box at bottom-right side may appear like below, which you may "ignore" or "cancel"


10) Now "Select country and language" small box will open. Here select "Different Country" and "English" and press "OK".


11) Now actual flashing will start and PHONE UPDATE TOOL (shown below) will appear, and if your KDZ file is good flashing will end without any issue. 

JUST RELAX!! SIT BACK WITH HANDS FOLDED BEHIND HEAD AND WATCH IT HAPPENING. 

When it finishes full flashing and phone will start rebooting. 

YOU CAN REMOVE CABLE AFTER 100%, AND FLASHING IS FINISHED!!!
 Close all programs.

Quote:
FLASHING ERROR AT THIS POINT? If you have installed JB before then your flashing may stop at 4% to 14%.This may be due JB rom already installed before or due to driver not completely installed for "SW Upgrade Mode".

WORKAROUND: Cancel flashing by exiting LG Update Tool. Phone should be still in SW Upgrade Mode, Remove USB Cable, wait 10 seconds, Insert USB cable again and let all drivers install for this mode. The device manager should look LIKE THIS SCREENSHOT. START AGAIN FROM STEP 6 (Read about Post-JB Issue)


BOOTLOOPS? STUCK AT LG LOGO? : Dont worry!!! If you were on CM and flashed JB or vice versa or your data partition is not matching with new partitions, then your phone may get BOOTLOOPS on LG Logo.

HARD-RESET to solve it (Press VolDown, Home and Power all together) You will loose data, dont worry, before starting you took BACKUP and I am sure about it.  Phone should start normally. (Click for correct method of HARDRESET)

You're done!!! Phone is FLASHED!!!


12) Remove lines we added from HOSTS file mentioned above. Do it now!!! Dont complaint later that LG KDZ download links are not working. LOLZ 

IMP NOTE: This is also called OFFLINE FOTA and all your Phone Settings, DATA on internal card and external card and also the installed APPLICATIONS will remain as it is. Enjoy!!

TROUBLESHOOTING, IN CASE OF ANY ISSUES: Check following workarounds.
  1. Uninstall LG Driver, RESTART PC and then REINSTALL DRIVER before connecting phone to pc.
  2. Run B2CAppSetup.exe and let it download and install LG Support Tool. After it opens just close it because it will not be needed later.
  3. After Adding lines in HOSTS file, confirm if file is saved or not and then RESTART PC to see the added lines are there or not. This is to be done after first step is done.
  4. Sometimes the downloaded file could be corrupted too. Do fresh download when your internet connection is good.
  5. "Microsoft Security Essential" (Antivirus+Firewall) falsely recognizes "C:\shttps\http.exe" as virus (false alarm) and blocks it. Either allow it to execute or Get RID of this Antivirus.
....and try again with next procedure.


B) Root Rootable KDZ with OLD Bin4ry method.

Second Post (see below) ...
ATTACHED FILES
File Type: zipKDZ_FW_UPD_EN.zip - [Click for QR Code] (3.05 MB, 9232 views)
File Type: zipshttps.zip - [Click for QR Code] (3.00 MB, 4742 views)

ZTE Hardware And Software Repairing


Yesterday my friend brought me an Orange San Francisco phone, asking me to reset it. I’ve tried various methods, described on sites, but the only one that worked was to flash new firmware. When I tried to reset it using Privacy – Erase Personal Information, the phone just hanged up after reboot.
The method I describe below will make your phone lose warranty. So if you would like to keep it on warranty, you should choose any other methods (maybe better bring it to your cell provider to fix it). I don’t assume any responsibility if your phone becomes brick after applying any method described in this article.
Let’s start with the list of files you need to flash the firmware.
You can download an archive with all the necessary files here.
Once we have everything downloaded, let’s start with the update process:
  1. Copy all the files mentioned above to the root folder of your sd card. I suggest you to format your card before copying these files there.
  2. Install UniversalAndroot from your sd card. You should allow installation from untrusted sources before. Run UniversalAndrootafter installation and ensure your phone is rooted. You should receive the message about it if everything is OK.
  3. Install RecoveryManager. Run RecoveryManager, allow it to action like a root. Go to the Recovery section (top menu). Select “Install Recovery”. Select the recovery-clockwork image you’ve copied to your SD card. Wait until everything is complete. Close the application.
  4. Turn off your phone. I suggest you to take off the battery ans wait at least 10 seconds. Then hold Volume Down button and press the Power button. Hold both buttons pressed until you see the Recovery Clockwork menu.  Select Reboot System Now, by choosing the appropriate option using volume keys. Select by pressing the Home button (hardware button of the phone). Wait until the phone boots up and proceed to the next step.
  5. Preparing your phone to switch to Gen2 from Gen1. This is the way your phone is accessing the memory and you shouldn’t know much about it. Just do it :) .  Connect your phone to your PC, go to your SD card and extract Gen1-to-Gen2-TPT-v7.zip  file contents to SD card. You should have image folder in the root of your SD. Ensure your files are in the image folder. Unplug the phone and proceed to the next step.
  6. Installing Gen2 update. Switch off the phone and remove battery for 10 seconds. Hold Menu and Volume up (+) buttons and press the Power button. Gen2 update will start automatically. Don’t touch the phone during this process, just seat down and relax :) . The phone will be booted in recovery mode after the process is completed.
  7. After you phone is booted in recovery mode, choose “Wipe Data/Factory Reset“. We need to clean up everything before applying the update. You should remember that volume keys are used to navigate and Home button to select the items. After you receive the message that the Wipe process has completed successfully, you should proceed to the update itself. Choose install zip from sd card option. Then use select zip from sd card. Locate update-cm-7.1.0-Blade-signed.zip and select it. It should take several minutes to process the update. After getting a message that the update process has been completed, press the back hardware button (next to home and menu) and select reboot system now.
  8. Wait for the phone to boot for the first time. It should take a couple of minutes (up to 10), so be patient and don’t touch your phone until it boots up. Everyhting should be ok. Now we need to proceed to the next step – to install Google apps package. Turn off the phone and wait 10 seconds
  9. Hold Volume down button and Power up the phone. You should have the recovery manager menu on your screen. Choose install zip from sd card and select gapps-gb-20110307-signed.zip on the next step. After getting a message that the update process has been completed, press the back hardware button (next to home and menu) and selectreboot system now.
  10. After your phone is alive, use file manager and go to your SD card. Install google-maps.apk to have Locator and Navigator enabled.
Have you expected more steps? There are just 10. Hope this guide helps someone to have the latest firmware on the ZTE Blade (I had a branded version named Orange San Francisco).

Huawei Software And Hardware Repairing


How to Flash Huawei USB Modems (and Re-Install the Firmware)

A guy I personally know got a USB modem from the UK and the modem was locked to 3, a UK mobile network. On getting to Nigeria here, he found out the modem wouldn’t work with SIM card. The modem prompted for an unlock code and this dude kept guessing till he entered it incorrectly ten times. He rendered the modem useless and even DC unlocker couldn’t unlock it. I tried all I could but it didn’t work. I decided to try flashing the modem and re-installed the firmware but still, the unlock counter still read 10. Before the modem finally became useable again, I did three things to flash it:
1. Reset the unlock counter
2. Upgrade the firmware
3. Install a different dashboard

1. How to Reset the Unlock Counter

Like I said earlier, upgrading the firmware did not reset the unlock counter which read 10 out of 10. I had to reset the counter with a software first. If you haven’t entered your unlock code 10 times like the guy in question did, you should skip this step. Of course, you can still do it if you want to unlock your modem and anyway.
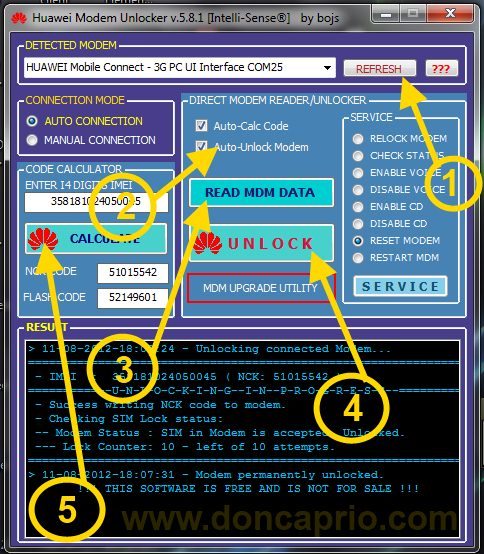
- Download this software
- Extract the content and run the .exe file inside
- Click on Refresh. Your modem should be automatically detected so far you checked AUTO CONNECTION under connection mode
- Be sure Auto-Calc Code and Auto-Unlock Modem are both marked
- Click READ MDM DATA
how to flash your huawei usb modem
- Now click UNLOCK. This should both unlock your modem and reset the counter at the same time
- Lastly, click on Calculate to generate the flash code. You’re gonna be needing it later.

2. Upgrade your Modem Firmware

- First, you must download the right firmware for your modem. You can download it from theirofficial website but I prefer and recommend dc-files.com
- Select Huawei or what model your modem is and click the tiny modem icon
flash huawei usb modem
- On the next page, select your model and click the same modem icon again.
flash huawei modem
- Now, download Firmware Update and Dashboard Update
flash modem
Now to upgrade the firmware, unzip the firmware update you downloaded and double-click the .exe file.
- Accept the agreement and proceed.
how to upgrade huawei modem firmware
- The program searches for your modem for some seconds
flash huawei modem
- On the next page, simply hit the Next button
huawei usb modem flashing
- When the flashing starts, be sure you follow the instruction on-screen. Do not remove your modem and be sure you have enough poer on your laptop or UPS to last for about 30 minutes.
huawei usb modem flashing
- When you hit the start button, you may be prompted to enter your Flash code. This only happens when the new firmware version is different from the existing one on the device. Remember the Flash code you generated earlier? Enter it here.
flash huawei usb modem
- The process starts and normally, this should take less than 10 minutes.
huawei modem firmware upgrade
- At this point, you don’t have to do anything. Just wait till you see a message that looks like this:
firmware upgrade successful
- Congratulations! You just upgraded you modem firmware successfully!

3. Installing a different dashboard

Even with an upgraded firmware, I was still seeing that same dashboard that came from 3 network. The dashboard wouldn’t let any me use any other SIM though the modem is already unlocked. I had to install a different dashboard to make me use our network provider settings here in Nigeria.
It’s here you’ll be needing the Dashboard Update file you downloaded.
- Unzip the file and run the executable file
- Accept the agreement and continue
- Again, the software should search for your device
-Hit the Next button as before and the procedure is very much similar to the firmware upgrade you did earlier.

See Also

Motorola Hardware And Software Repairing


The A810 is made by E28 company in china and like regular moto linux phones, it is not based on a PXA270/Freescale Neptune solution, but on OMAP730/850 and it is a linux phone .
It can run Android!!
Great phone!!!!


Drivers are meant for Windows 2000 and XP

1. Extract the folder wherever you like.Also extract the
drivers in the zip format named 'hailing-download-driver' where u want.

2. Make sure that the firmware is in the folder where the flasher_hs.exe is located.

3. Go to the Drivers Folder and Right Click on OMAP750_850.inf and click install.

4. Then Start Flasher_hs.exe

5. Switch off ur phone and connect it with ur pc.

6. A 'New Hardware Found' prompt would come


A FOUND NEW HARDWARE WIZARD WOULD COME

click no, not this time -> next
click next and you come to the window where u have to install automatically and manually, click on 'Install from a specific location' -> next

click on search the 'best drivers in these locations' and then only click on 'Include this location in search' and browse where the driver OMAP750_850.inf is located and click next.

now it will install these drivers, then the flasher_hs will automatically start the flashing process.

HAVE FUN!!!!

Sunday, 21 July 2013

Printers And Scanners Hardware And Software Repairing


Printers Hardware & Software Repairing


we are repair all type of dmp printer heads like- epson , tvs , wipro , panasonic etc....avilables spears of printers , logice card , smps , printer head ( new / old ) rd assemble , pf gears , cables etcavilables spears of laser printer & deskjetsformater card , smps , power adeptors, teflons , caridge unit , paper tray, pik up rollers, spration pad , fuser unit scaner unit etc

MV repairs printers made by Hewlett Packard, Lexmark and Okidata to name a few. We offer service on several models of thermal/barcode printers as well. Brands include Zebra, Intermec & others

Our technicians are trained to properly repair and clean your printer with each service call. We also make recommendations on how to increase your printer productivity, optimize printer drivers and update firmware to increase printer performance


Scanners Hardware & Software Repairing


We have the widest selection of Scanner Repair Parts. We stock many common Scanner Repair Parts and have them available when others don't. Our Knowledgeable Staff is ready to help you find just what part you need, with convenient online chat for fast answers to your questions. Custom high-resolution photos for many parts and kits to help you identify them correctly. Click any photo to enlarge. 

We check availability from all major parts sources when you order. Don't spend hours searching for the part you need--if anyone has it we will find it for you! Use our Support Minder system to automatically remind you when it is time to replace consumables and renew service contracts. 

Our database is cross-referenced by scanner model--quickly find parts for your scanner and be sure the part you are buying goes with your scanner. 

Twitter Delicious Facebook Digg Stumbleupon Favorites More

 
Design by MUHAMMAD WALI KHAN SEO/SEM | WEB DEVELOPER / DESIGNER Also Online Internet BUSINESS And Marketing Consultant. OR IT HARDWARE AND SOFTWARE ENGINEER